Sunday, November 27, 2011

The computer appears to be working electronically now. There are a few things that seem a bit wonky. The Reset/Hold/Operate switch may be a bit dirty, since it was not working reliably at first, but using it seems to be clearing it. Also, I can't get the meter to null pots when the voltage is negative, so there is something not right there that I'll have to fix.

But, it works and it computes. The circle to the left is what you get for y''=-y, where I'm plotting y in one axis and y' in the other. Since the answer to this equation is a sinusoid, you expect it to plot a circle, which it does. Interestingly, it will draw over that same circle over and over again with no apparent drift. After all these years it is rock solid. The plotter did start to have problems in one axis after a while, so I'll have to work on it.  But, the computer really does work.

It is all together other than the case, which I'm painting. I should get it installed this week. I'll look at that pot bus issue and tear back into the printer again to see why the X axis is binding up.

Wednesday, November 23, 2011

Back to the project

I can't believe it's been all of the way since May that I've had time to work on this project. Summer is a time of travel and projects on the house, then I had a really heavy load this fall with a lot of students, buggy software, and revisions to courses that I teach. I've just not had any time at all to work on this project. But, the semester is finally coming to a close and I am starting to have a bit more time available as I finish up projects for classes.

I've been working on two things lately. I finally got around to calibrating the quarter squared multiplier. I thought it had a problem with one section, since the bottom range was not working, but after I had finished the other sections and went back to it, it started working as I was moving pots. I think it had a dirty pot that was not making contact and I cleared it when I moved them. Anyway, it appears to be working now. I had to break the factory seals to adjust it and the adjustments were very small. It was almost in spec before I even started.

I'm also working on painting the case. I'm still debating about what to do. The original textured powder coat was pretty scratched up and was stained on top where people had put drinks and probably cigarettes (remember, this is from the 60's). I tried painting a coat on it to retain the texture, but I don't really like it. I'm debating between brown, the original color, or black, which I think would probably look nicer. I considered trying to get it repainted by someone who could duplicate the finish, but I don't really think that matters all that much, so I'm going to make it look how I like.

Friday, May 13, 2011

Multiply also works...

The last untested electronic component is the multiplication module. I plugged it in and it appears to work in all four quadrants. It did take a lot of patch cords to set it up, since you have to feed it both a signal and the negative of the signal to multiply. Hence, it took two amplifiers just to negate the inputs. But, it appears to work. I needs to be calibrated, of course. This is the last major module to plug in and the monster will be all working, though there is at least one amplifier that is still wonky. I won an auction for a function generator today, so I can test them all properly.

Note the simple service shelf I made.

I did get the x-square module calibrated and tested it a couple days later to ensure it was holding calibration. It works perfect and has been installed. I wrote a post about that at the time, but blogger ate it in the great crash they had and it has not come back.

Tuesday, May 10, 2011

Power inlet

Up till now I had been powering the TR-20 through a power cord I soldered to the back of the power inlet. It had an old 3-pin power socket and did not come with a power cord. I tried to find one of those cords. I'm pretty sure I've thrown a few away in the past. But, no such luck. So, I replaced the power inlet with a modern IEC style inlet. It looks much nicer now not to have the cord dangling from the back and it's probably safer as well.

Saturday, May 7, 2011

X2 Function generator

I put power to the two sections of the x2 function generator. In keeping with my good fortune so far, it works. It is out of calibration, of course. The largest error is about 3.5%, though it is closer to 1.5% over most of the range. It just needs adjusting.

It works by approximating the quadratic function with a 7-part piecewise linear function. They use switching diodes to determine the segment. Like all things on the TR-20, it works in conjunction with an amplifier section. This is why it needs 14 amplifiers. There are two x2 sections, one for negative input and the other for positive. You can patch them both together to support bipolar input. Both work, though I did not test the tolerance in the position section, yet.

I hooked up my homemade extender and made a pass at calibrating it. It worked just fine for the negative side, though the first two pots are at the limit (but are in tolerance). The positive side would not work with an input greater than 7.5 volts. The diodes all tested okay. After some diagnostics, I figured out it worked perfectly on a different amplifiers, so amplifier 13 appears to have a problem with larger negative voltages. I'll work on it later on.

I also hooked up two of the precision potentiometers to the 10V supply and the inputs to the plotter. It works perfectly, though I don't have a pen, yet. You can adjust the pots to move the pen on the plotter. It's the worlds most complex and precise Etch-a-sketch.

Thursday, May 5, 2011

Companion plotter

Two common output devices for an analog computer are an oscilloscope and a plotter. I picked up a 80's era HP 7015B XY plotter on eBay to go with the TR-20. It was filthy and the white surface was peeling up when I got it. I dismantled it and cleaned everything thoroughly. A bit of glue fixed the paper grip surface.

The white surface has a grid under it with 900 volts DC on it. When activated, it creates a charge the pulls the paper down and holds it in place.

The TR-20 I own originally came with a 4 channel XY scope. It even has the module to feed signals to the scope and the connector on the back for it. I doubt if many of these have survived. I may try to find a good use 4-channel scope to recreate that functionality later on. For now, my simple 2-channel Tektronix scope should work just fine.

Tuesday, May 3, 2011

All amplifiers are working

Amazingly, I have now cleaned up and installed all 7 amplifier modules. All 14 amplifiers work! They balance very well, don't seem to drift, and they amplify correctly. I still want to put some AC signals on them to test them more thoroughly, but I'm waiting to catch a function generator as a good deal. I've also put back in three of the potentiometers modules and the second dual integrator. Other than issues with the reference supply, everything is working. I've cleaned it all up substantially, so i looks much nicer as well.

Wish I could find some more of those nice EAI bottle plugs.

Saturday, April 30, 2011

Reference supply repaired I hope

My Digikey order arrived Friday. Today I replaced the two power transistors on the reference supply. I also changed the capacitor for a new one. When I first plugged it in, it was still not working, so I built my card extender so I could get it out. But, after some balancing and a warmup, the reference supply kicked in perfectly for both polarities. I'll see if it keeps working. There is a chance that there is a loose connection somewhere that is making it intermittent sometimes. But, it appears to be working fine, now.

I think I need to also let it run for an hour or so, then adjust everything. It may need some time to stabilize.

Thursday, April 28, 2011

Front panel is much nicer - ordered parts

I finished the front panel restoration. I repainted the knobs and polished the aluminum. I replaced the dot with a red lacquer stick. The original was white, but I thought the red would look nicer. It's a massive difference from before. Everything looks new except the lettering in places has worn off. I don't really know a reasonable option for that without getting into silk screening.

The reference supply died again. I thought it might have just been a bad connection, but I think the power transistor is dead. I ordered new power transistors and I'm going to replace both with more modern parts. The amplifier works just fine. I tested it. I have three of the amplifiers installed and tested now as well. I need to get a function generator to properly test them, but I've not found a deal on eBay, yet.

I found a date of July 20, 1967 printed on one of the modules. I was 8 years old when this was built. It's amazing that so much of it appears to still work.

Saturday, April 23, 2011

Cleaning up the front panel

I dismantled most of the front panel today. It was very dirty and scratched up in places. After some experimentation, I found that a good auto polish and the grinder with a buffing wheel does wonders for the paint. It doesn't put back where the lettering is rubbed off and I have no idea how I can do that. But, it looks much brighter and shinier than it did before.

The polish also works well on the modules. I have two amplifiers installed and working at this point, though I'll be down a while until I get the panel back together.

I also pulled the knobs. I put a coat of black paint on them to renew the black. It's not as good as the original anodized aluminum coating, but it's all I can reasonably do. After I am comfortable the paint is good and dry I'll put them in a drill and clean and polish the bare aluminum parts.

Tuesday, April 19, 2011

Reference supply is working now

I've been working on the reference power supply. It uses one of the dual amplifier modules that is pretty much identical to the rest of the ones in the machine and a module with a heated zener diode and a couple power transistors for current boost. The positive supply worked fine, but the negative was pegged at -15V. It should be -10V. I thought the transistor was bad, but as I was fiddling with it, it suddenly started working. I think it may have been a bad connection in the patch cords or in the adjustment pot. Now it locks on solid as a rock.

They are really fond of using little light bulbs as current limiters on output stages. They try very hard to protect everything from what a user might do like patching an output to a power supply.

I'll have to decide what to move to next. I'll keep an eye on this reference supply to be sure it continues to work.

Saturday, April 16, 2011

Capacitor reforming

I did get the TR-20 completely dismantled. If they sit around for decades, electrolytic capacitors lose their internal insulating oxide. If you just plug them in, they will internally short, get hot, and potentially explode (not a big bang, but very messy).

But, they can often be recovered using a process called reforming. You apply voltage at the capacitor rating through a current limiting resistor for many hours and the oxide reforms. The picture shows the setup with lots of jumper leads. I'm reforming the 4 big 2500uF electrolytic capacitors in the power supply. I experimented with one and it was working well, so I set them all up and they are sitting there. They all appear to be recovering well. I will reform them for about 6 hours this way, watching the voltage carefully. There's some smaller caps on the power supply board, but I'll get these first. Those may be easier to just replace.

I want to get the power supply completely working first. Then I'll start moving in modules one at a time, starting with the reference supply, which uses the same precision amplifiers as the rest of the machine.

Bought a 1960's era EAI TR-20 Analog Computer

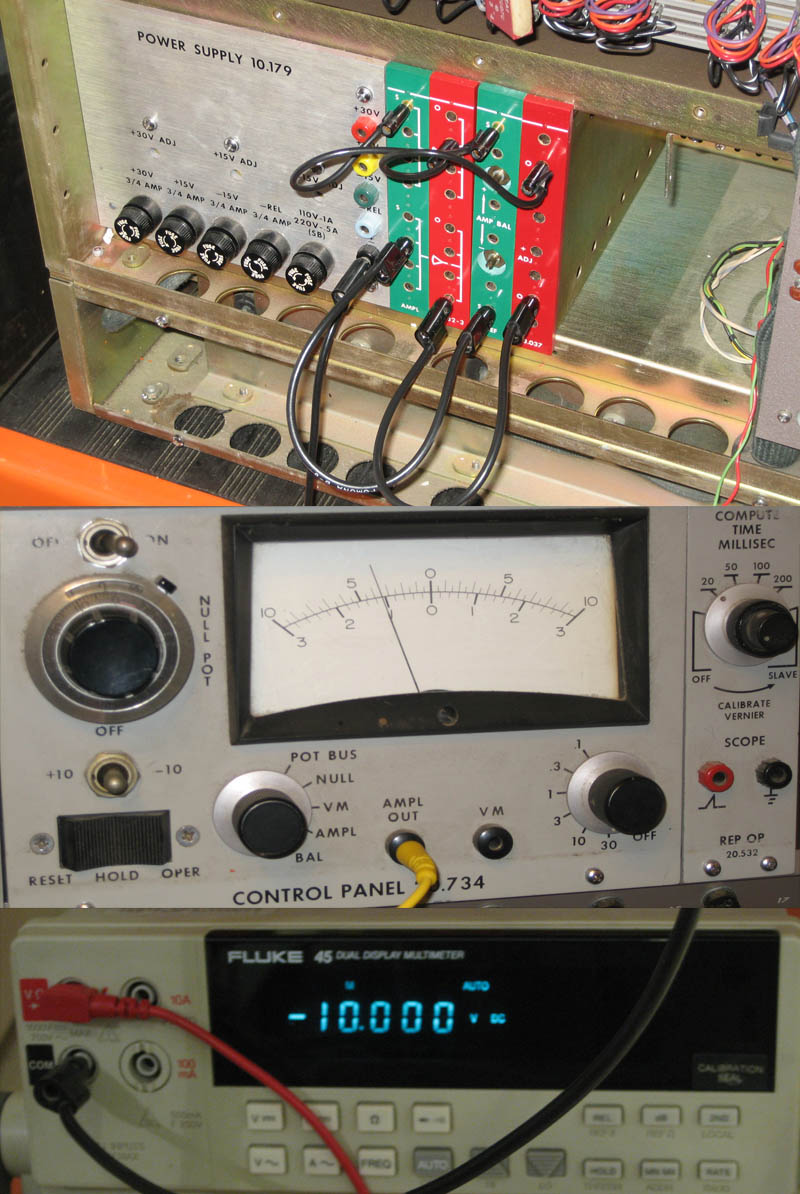
I managed to purchase a 1960's era Electronic Associates, Incorporated (EAI) TR-20 Analog Computer on eBay. These don't come around very often and I've put in snipes before, but never come close to winning one. This one was in West Lafayette, IN, which is in driving distance and was listed as local pickup, though he said he would ship in the ad. I think that impacted the price and I got it for less than people are paying for those horrid little Heathkit analog computers or the Compdynas. And, the computer museum has the owners and maintenance manuals online, so it's something I can work on. It has 14 amplifiers, 6 integrator networks, a multiplier, an x^2 diode function generator, the repetitive operations option, 6 precisions potentiometers, and 10 additional potentiometers. It has the card for the external display, but that was not included, nor was a power cord. It did come with quite a few patch cables and bridges.

It's one of the earlier ones, likely around 1967, so it's about 44 years old. It was the state of the art in that era for analog computation. It cost around $10,000 in the 1960's. I got it for a tiny fraction of that. It is, of course, completely obsolete, but it is a bit of history and I was fascinated with the analog computer they had at La. Tech when I was an undergrad.

It likely has been sitting around for decades or more, so I'm bringing up to slowly and hope to get it completely running. Many of the parts are pretty normal, but there are a lot of prevision parts and some things, like the chopper relays, may be very hard to replace.

I'm keeping my eye out for an XY plotter and scope to go with it.